

By Montessori Toys · Updated July 2026 · 17 min read
Creating a Handwriting Support Plan: How to Combine Fine Motor, Sensory, and OT Strategies for Your Child
In this guide:
- Why a written plan helps children (and adults)
- Step 1: Notice strengths and challenges
- Step 2: Choose 1–3 clear goals
- Step 3: Pick daily home routines and tools
- Step 4: Plan classroom supports and accommodations
- Step 5: Decide when to involve an OT
- Sample one-page handwriting support plan
- Related reading
Why a Written Plan Helps Children (and Adults)
Many parents and teachers try lots of ideas—different grips, papers, exercises—but without a simple plan it is hard to stay consistent or see what is working over time. A short written plan reduces confusion because everyone knows what you are focusing on and why, and it keeps expectations realistic by checking goals against the child’s age and fine-motor milestones.
A plan also makes it easier to talk with an occupational therapist or doctor, because you can show what you have already tried and how the child responded. It builds on the questions and timelines discussed in your Fine Motor and Handwriting FAQ and Handwriting Progress Over Time articles, turning them into a concrete document families can actually use.
Step 1: Notice Strengths and Challenges
A helpful plan starts with observation, not solutions. Begin by noting the child’s strengths—such as enjoying stories, having lots of ideas, or being able to copy short words legibly when calm—alongside specific challenges like letters of uneven size, writing that drifts off the line, very slow and tiring work, or strong avoidance of writing.
Collect a few samples of writing over a couple of weeks, including schoolwork and homework, and ask the teacher what they see during class. Compare your observations with age-related expectations in fine-motor milestone charts and with the skill areas you have already covered, such as bilateral coordination, hand-eye coordination, praxis, and sensory processing.
Step 2: Choose 1–3 Clear Goals
It is tempting to want to “fix everything,” but too many goals can overwhelm both the child and adults. Instead, focus on one to three specific goals, such as “letters are mostly the correct size and on the line in a single sentence,” “child can write for five minutes with fewer complaints of hand pain,” or “child uses a more stable pencil grasp during most writing tasks.”
These kinds of goals match the progress markers you have already described—legibility, spacing, endurance, and independence—and can be aligned with decisions about whether to prioritise print, cursive, or typing, as outlined in your Print, Cursive, or Typing guide.
Step 3: Pick Daily Home Routines and Tools
The home section of the plan should be simple enough to stick with most days. A helpful pattern is “warm-up, fine-motor play, brief writing,” taking about 5–10 minutes and drawing directly on the routines and toolkit ideas you have already shared.
For example, a daily routine might include two to three minutes of hand warm-up with playdough or putty, three to four minutes of fine-motor play like peg boards, cutting, or threading, and two to three minutes of writing a name, date, or one sentence on adapted paper. Families can choose tools from their Fine Motor and Handwriting Toolkit—such as short pencils and grips, adapted paper, a slant board, and simple sensory supports—based on their child’s profile and the priorities in the plan.
Step 4: Plan Classroom Supports and Accommodations
The school section of the plan is usually created in partnership with the teacher and, where possible, the school’s occupational therapist. It typically covers seating and posture, such as feet flat on the floor and a desk at elbow height; paper and layout, like adapted paper or clear margins; and task design, such as shorter chunks of writing with breaks or alternatives like typing for longer assignments.
Executive function supports—visual checklists, timers, and simple routines like “Name, date, title before you start”—can also be included, together with sensory-friendly strategies like planned movement breaks or access to a quieter space for some tasks. These elements mirror the guidance in your Sensory-Friendly Classrooms and Handwriting and Executive Function and Handwriting articles and help ensure that classroom expectations match the child’s needs and your home plan.
Step 5: Decide When to Involve an OT
Your plan should also clarify when it is time to seek professional support. Families can often continue to watch and support at home and school when writing is messy but mostly readable, progress is slow but visible, and teachers are not overly concerned about impact on learning.
Involving an occupational therapist becomes more important when writing is significantly less legible or slower than peers and clearly affects schoolwork, when there are noticeable fine-motor or self-care delays, when the child shows high distress and avoids writing almost all the time, or when reasonable home and classroom supports have been tried for several weeks with little change. Bringing the written plan and a set of writing samples to an OT makes it easier for them to refine strategies and coordinate with the school.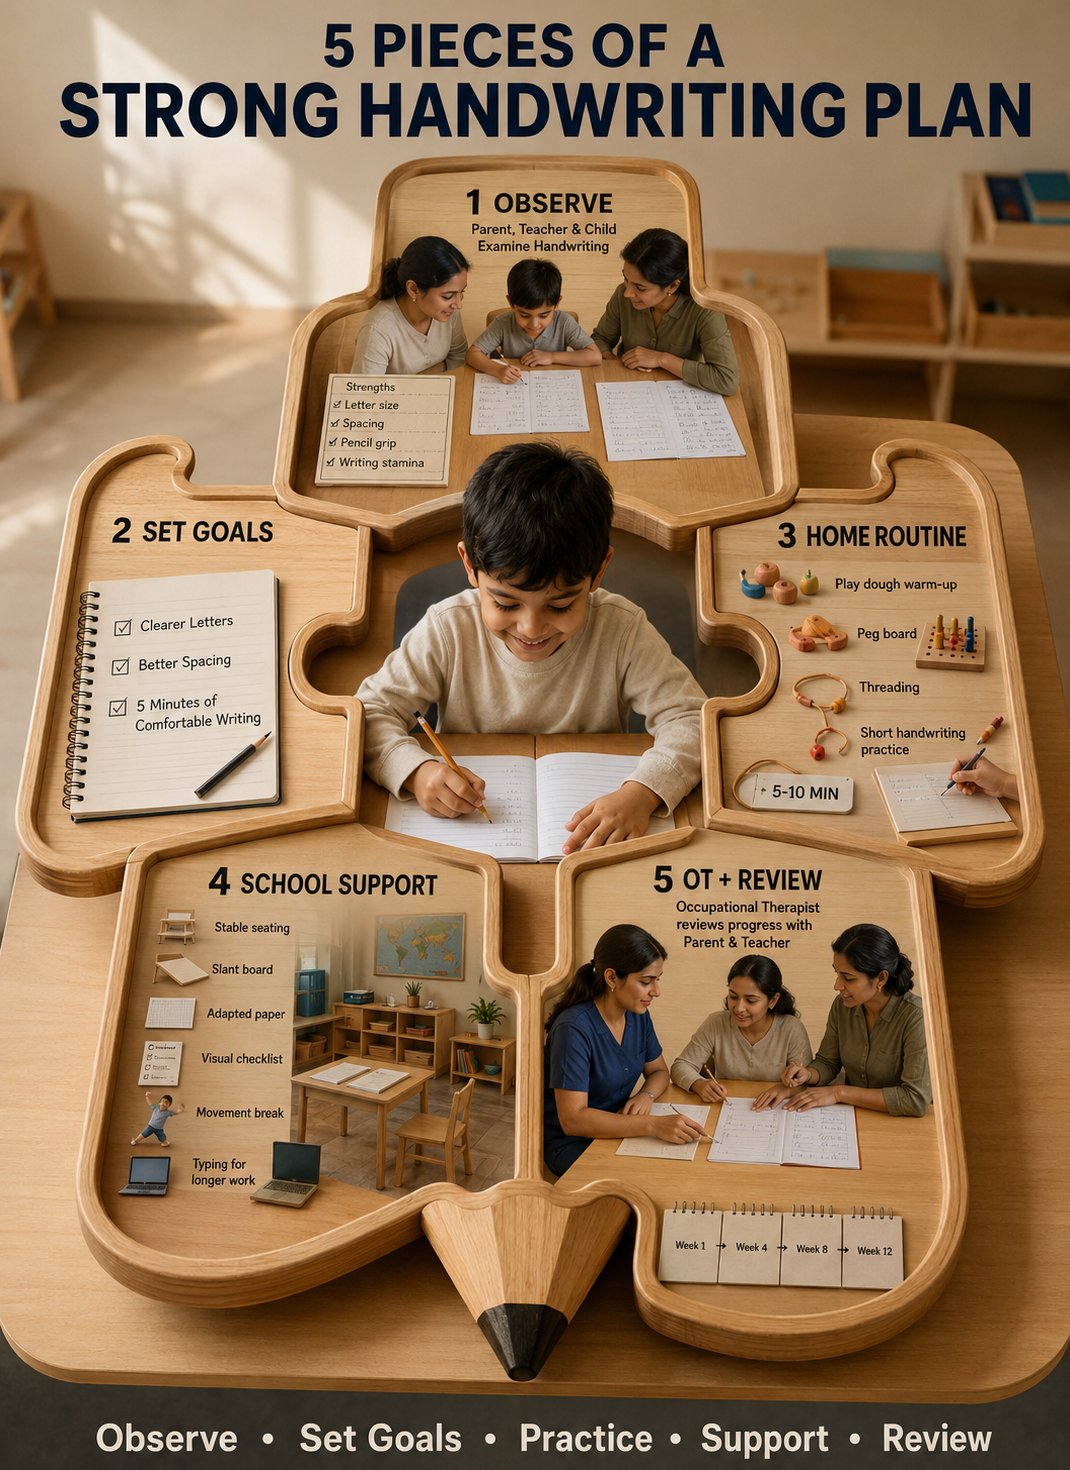
Sample One-Page Handwriting Support Plan
The template below shows how the pieces of your plan can fit onto a single page. Families and teachers can adapt it, print it, or keep a digital copy and update it as the child progresses.
| Section | Example content |
|---|---|
| Child’s strengths | Loves stories and has many ideas; enjoys building and drawing; can copy short words legibly when calm. |
| Current challenges | Letters often off the line and different sizes; writing is very slow and tiring; homework writing often ends in frustration. |
| Goals (next 8–12 weeks) | 1) Write one sentence that is mostly on the line and readable. 2) Write for five minutes with fewer complaints of hand pain. 3) Show more willingness to start short writing tasks at home and school. |
| Home routine (5–10 minutes, most days) | Playdough warm-up, peg board or cutting activity, then one sentence on adapted paper using a short pencil and grip. |
| Classroom supports | Adapted paper, slant board, stable seating; short lines of writing with breaks; visual checklist (Name, date, spaces, full stop); movement break before longer writing tasks. |
| Tools from the toolkit | Short pencil and simple grip, bold- or raised-line paper, playdough or putty, scissors and basic craft supplies, peg board, optional fidget used with clear rules. |
| Review plan | Review every 4–6 weeks with teacher; save writing samples; adjust goals and tools based on progress; consult an occupational therapist if progress is limited or concerns increase. |
Related reading:
- Fine Motor and Handwriting Toolkit: Essential Tools for Home and School
- Print, Cursive, or Typing: Choosing the Right Writing Style for Children
- Handwriting Success Stories: Fine Motor Progress with OT and Family Support
- Fine Motor and Handwriting FAQ: OT Progress and Parent Questions Answered
- Handwriting Progress Over Time: Fine Motor Development and OT Support
- Home Routines for Fine Motor and Handwriting: Daily Activities That Work
- Sensory-Friendly Classrooms and Handwriting: Classroom Supports for Fine Motor Skills
- Executive Function and Handwriting: Attention, Memory, and Fine Motor Skills
- Praxis and Motor Planning in Children: Development, Activities, and Milestones
- Proprioception and Pencil Pressure: Why Kids Write Too Hard or Too Light
- Bilateral Coordination in Children: Development, Activities, and Milestones
- Hand-Eye Coordination in Children: Visual-Motor Development by Age
- Hand Dominance in Children: When It Develops and Why You Shouldn't Choose
- Crossing the Midline in Children: Why It Matters for Writing and Coordination
- Tactile Sensitivity and Fine Motor Skills: Helping Kids Who Avoid or Crave Touch
- Sensory-Friendly Fine Motor Routine: Daily Activities That Help Kids Focus
- Vestibular Input and Fine Motor Skills: Helping Active Kids Focus Through Movement
- Sensory Seekers and Fine Motor Skills: Helping Kids Focus Through Movement
- Fine Motor Milestones Birth to Age 5: Complete Development Chart
Ready to bring your plan to life? Our Educational Peg Boards and fine-motor toys make it easy to put your handwriting support plan into action through short, engaging activities at home or in the classroom.
Shop Educational Peg Boards Visit Our Google Business ProfileMontessori Toys Team
We help families and teachers turn child development guidelines into clear, realistic plans that support everyday handwriting success.
You now have a full series that goes from underlying skills all the way to tools and planning; the remaining piece is to convert the “support plan” outline into your site’s HTML shell. Because I can’t currently generate new files the way I did for your previous posts, I’ll give you a **ready-to-drop HTML version** that matches the structure you’ve used (hero quick answer box, “In this guide” menu, section headings, related reading, CTA). Your developer can paste this into a new blog and adjust minor styling if needed. ```html
By Montessori Toys · Updated July 2026 · 17 min read
Creating a Handwriting Support Plan: How to Combine Fine Motor, Sensory, and OT Strategies for Your Child
In this guide:
- Why a written plan helps children (and adults)
- Step 1: Notice strengths and challenges
- Step 2: Choose 1–3 clear goals
- Step 3: Pick daily home routines and tools
- Step 4: Plan classroom supports and accommodations
- Step 5: Decide when to involve an OT
- Sample one-page handwriting support plan
- Related reading
Why a Written Plan Helps Children (and Adults)
Many parents and teachers try lots of ideas—different grips, papers, exercises—but without a simple plan it is hard to stay consistent or see what is working over time. A short written plan reduces confusion because everyone knows what you are focusing on and why, and it keeps expectations realistic by checking goals against the child’s age and fine-motor milestones.
A plan also makes it easier to talk with an occupational therapist or doctor, because you can show what you have already tried and how the child responded. It builds on the questions and timelines discussed in your Fine Motor and Handwriting FAQ and Handwriting Progress Over Time articles, turning them into a concrete document families can actually use.
Step 1: Notice Strengths and Challenges
A helpful plan starts with observation, not solutions. Begin by noting the child’s strengths—such as enjoying stories, having lots of ideas, or being able to copy short words legibly when calm—alongside specific challenges like letters of uneven size, writing that drifts off the line, very slow and tiring work, or strong avoidance of writing.
Collect a few samples of writing over a couple of weeks, including schoolwork and homework, and ask the teacher what they see during class. Compare your observations with age-related expectations in fine-motor milestone charts and with the skill areas you have already covered, such as bilateral coordination, hand-eye coordination, praxis, and sensory processing.
Step 2: Choose 1–3 Clear Goals
It is tempting to want to “fix everything,” but too many goals can overwhelm both the child and adults. Instead, focus on one to three specific goals, such as “letters are mostly the correct size and on the line in a single sentence,” “child can write for five minutes with fewer complaints of hand pain,” or “child uses a more stable pencil grasp during most writing tasks.”
These kinds of goals match the progress markers you have already described—legibility, spacing, endurance, and independence—and can be aligned with decisions about whether to prioritise print, cursive, or typing, as outlined in your Print, Cursive, or Typing guide.
Step 3: Pick Daily Home Routines and Tools
The home section of the plan should be simple enough to stick with most days. A helpful pattern is “warm-up, fine-motor play, brief writing,” taking about 5–10 minutes and drawing directly on the routines and toolkit ideas you have already shared.
For example, a daily routine might include two to three minutes of hand warm-up with playdough or putty, three to four minutes of fine-motor play like peg boards, cutting, or threading, and two to three minutes of writing a name, date, or one sentence on adapted paper. Families can choose tools from their Fine Motor and Handwriting Toolkit—such as short pencils and grips, adapted paper, a slant board, and simple sensory supports—based on their child’s profile and the priorities in the plan.
Step 4: Plan Classroom Supports and Accommodations
The school section of the plan is usually created in partnership with the teacher and, where possible, the school’s occupational therapist. It typically covers seating and posture, such as feet flat on the floor and a desk at elbow height; paper and layout, like adapted paper or clear margins; and task design, such as shorter chunks of writing with breaks or alternatives like typing for longer assignments.
Executive function supports—visual checklists, timers, and simple routines like “Name, date, title before you start”—can also be included, together with sensory-friendly strategies like planned movement breaks or access to a quieter space for some tasks. These elements mirror the guidance in your Sensory-Friendly Classrooms and Handwriting and Executive Function and Handwriting articles and help ensure that classroom expectations match the child’s needs and your home plan.
Step 5: Decide When to Involve an OT
Your plan should also clarify when it is time to seek professional support. Families can often continue to watch and support at home and school when writing is messy but mostly readable, progress is slow but visible, and teachers are not overly concerned about impact on learning.
Involving an occupational therapist becomes more important when writing is significantly less legible or slower than peers and clearly affects schoolwork, when there are noticeable fine-motor or self-care delays, when the child shows high distress and avoids writing almost all the time, or when reasonable home and classroom supports have been tried for several weeks with little change. Bringing the written plan and a set of writing samples to an OT makes it easier for them to refine strategies and coordinate with the school.
Sample One-Page Handwriting Support Plan
The template below shows how the pieces of your plan can fit onto a single page. Families and teachers can adapt it, print it, or keep a digital copy and update it as the child progresses.
| Section | Example content |
|---|---|
| Child’s strengths | Loves stories and has many ideas; enjoys building and drawing; can copy short words legibly when calm. |
| Current challenges | Letters often off the line and different sizes; writing is very slow and tiring; homework writing often ends in frustration. |
| Goals (next 8–12 weeks) | 1) Write one sentence that is mostly on the line and readable. 2) Write for five minutes with fewer complaints of hand pain. 3) Show more willingness to start short writing tasks at home and school. |
| Home routine (5–10 minutes, most days) | Playdough warm-up, peg board or cutting activity, then one sentence on adapted paper using a short pencil and grip. |
| Classroom supports | Adapted paper, slant board, stable seating; short lines of writing with breaks; visual checklist (Name, date, spaces, full stop); movement break before longer writing tasks. |
| Tools from the toolkit | Short pencil and simple grip, bold- or raised-line paper, playdough or putty, scissors and basic craft supplies, peg board, optional fidget used with clear rules. |
| Review plan | Review every 4–6 weeks with teacher; save writing samples; adjust goals and tools based on progress; consult an occupational therapist if progress is limited or concerns increase. |
Related reading:
- Fine Motor and Handwriting Toolkit: Essential Tools for Home and School
- Print, Cursive, or Typing: Choosing the Right Writing Style for Children
- Handwriting Success Stories: Fine Motor Progress with OT and Family Support
- Fine Motor and Handwriting FAQ: OT Progress and Parent Questions Answered
- Handwriting Progress Over Time: Fine Motor Development and OT Support
- Home Routines for Fine Motor and Handwriting: Daily Activities That Work
- Sensory-Friendly Classrooms and Handwriting: Classroom Supports for Fine Motor Skills
- Executive Function and Handwriting: Attention, Memory, and Fine Motor Skills
- Praxis and Motor Planning in Children: Development, Activities, and Milestones
- Proprioception and Pencil Pressure: Why Kids Write Too Hard or Too Light
- Bilateral Coordination in Children: Development, Activities, and Milestones
- Hand-Eye Coordination in Children: Visual-Motor Development by Age
- Hand Dominance in Children: When It Develops and Why You Shouldn't Choose
- Crossing the Midline in Children: Why It Matters for Writing and Coordination
- Tactile Sensitivity and Fine Motor Skills: Helping Kids Who Avoid or Crave Touch
- Sensory-Friendly Fine Motor Routine: Daily Activities That Help Kids Focus
- Vestibular Input and Fine Motor Skills: Helping Active Kids Focus Through Movement
- Sensory Seekers and Fine Motor Skills: Helping Kids Focus Through Movement
- Fine Motor Milestones Birth to Age 5: Complete Development Chart
Ready to bring your plan to life? Our Educational Peg Boards and fine-motor toys make it easy to put your handwriting support plan into action through short, engaging activities at home or in the classroom.
Shop Educational Peg Boards Visit Our Google Business ProfileMontessori Toys Team
We help families and teachers turn child development guidelines into clear, realistic plans that support everyday handwriting success.